CAESAR IV
Reviewed by Game Boy!
Please note, all PC Games reviewed in this series are played by both men and women, boys and girls.
Welcome to a totally different, highly aesthetic city building game from Sierra. Sadly, it was and is their last, but what a way to herald the end with this artistic masterpiece.
Caesar IV, while being a game of its kind like no other, is a universe away from that of its predecessor, CIII and all of the others.
To start with, you have a lush lifelike terrain, one of mostly grass and the occasional desert province. As with Age of Empires III, another game I’ve reviewed and offered help with, you can zoom in and out. What makes this game so amazing, though, is the ability to tilt the map in addition to turning it as gradually as you want. Oh, and I almost forgot (not really) but you have 5 atmospherics: Day going into night and back into day, along with the occasional rain, snow and sand storms.
Although snow is less likely on a map, it does happen as you will soon see.
You very much need to forget a lot of the things from CIII, as this game is an entirely different beast altogether. Especially noted by the 3 different types of housing and, moreover, the labour differentials, none of which is indicated in an e-manual like the helpful one in CIII.

Housing. As mentioned, you have 3 types, 1 for each class of citizen as: Plebs, the core of your workforce; Equites, who provide labour for service buildings above the two standard risk ones; and the good old Patrician class. Villa dwellers as they are more commonly known.
Plebs live in Insula, which start with 70 occupants. They can evolve to two more levels, housing 110 and 150 respectively, with 1 and 2 basic goods. Equites live in Domus. They start with 40 occupants and can also evolve two more levels to 60 and 80. Be advised, they, along with Villas, will only evolve to their highest level if the housing is walled in and they have all their needs met. More on that later.
For now, enjoy this collage of the four additional atmospherics, including the after-effects of sandstorms in desert provinces and the splendour of snow, which is rare, on buildings, while night and rain make up the set.

The good and the bad. There are, as with any such game, challenges to overcome. Here are some of them: Trade problems when importing Exotic goods for Patricians. Caesar’s demands, especially for goods. Wrathful Gods. Overlooking the smallest detail (it’s easily done as I know only too well). Exact position of a building. Pre-placed roads. Terrain elevation. Not having the starting funds you need. And, lastly, the high level of workers you need for some industries.
Start your first game, and one of the things you’ll notice as you move the camera view around is that the map stretches on for… Note, despite what you can see, each map has a restricted border to it. An area that, despite being there, is a continuation of the map rather than the black edges of CIII, and cannot be built upon.
Camera view. As interesting as it is, and I use it a lot, it can be a hindrance if it is not set correct when deploying troops; although you move the cursor to place them, it doesn’t coincide with the camera view on the mini map.
This screenprint from the ‘Control panel’ shows the correct camera view with the map tilted from that of ‘a bird’s eye’ view when it is a square. If you move the cursor or cursor keys in any of the four directions (up, down, left, right), then, what looks like a V-shape glass moves accordingly.

Resources. Each of the turquoise blobs and squares in the above screenprint represent a non-farm or wood (timber trees) resource.
Having mentioned the control panel, let us now look at it in all its splendour. Please note, it is best viewed on a Desktop or tablet.
Left of ‘Overlays’ is the options button. This brings up save, load, etc. Its hot key is Esc.
Overlays. Your primary ones are Desirability and water.
Below that is the Name of your city followed by the map view.
The next three buttons are:
Advisors, World map for trading…
Undo button. Current funds. Your current population.
Roads and three types of housing.
Remove button. Resource buildings.
Health and sanitation. Shrines and temples.
Water supply including bridges. Government buildings.
Not visible inside the area between two columns is the information for the last building you left clicked.
The first four buttons at the bottom are pause and speed.

The ‘-‘ Button hides the control panel. The only reason for hiding the Control panel is to take a screenprint (Shift + Print screen). Download an ap named PhotoScape to load it onto the ‘Editor’.
…Review of mission button, which will come in handy after you complete a mission.
Date. Month above year.
Resource factories. Distribution, trade and storage.
Education buildings. Entertainment buildings.
Beautification. Military.
Again, not visible, is the occupancy and workers.
‘?’ is the help button
Placement of buildings. Because there is no set size to each building, as in CIII, certain buildings need to be pre-placed. Without workers? You either think or ask. YES! And here is why. You can ‘mothball’ any non-housing building (wells require no workers), something you may find yourself doing having fulfilled an exorbitant request for goods from Rome, and click any housing building to not accept residents, something you’ll do having placed some of them, something like this:

As you will discover, both from the screenprint above and one other, there are two ways to lay out villa housing. Of those, the one above is the most common one.
The thing to note is this: 3 Villas (the other 4 not needed as yet), 4 Domus and 6 Insula will fit perfectly along and sit within the same stretch of road. That means, you only need to place 2 villas to start with and only have all 6 occupied as you move towards completing the mission; villa housing evolving as a result of the fully operative buildings around them.
Incidentally, the gap in between the road and the backs of the 4 Domus has been carefully measured to accommodate a library – that being the largest of the non-entertainment buildings excluding the forum – with an odium beside it.
Ratings. CIV has 5 as usual: Culture, Security, Prosperity, Favour and Population.
Through a combination of trade exports, your people’s needs and those of Rome, you will invariably find yourself having to exceed the population goals, both in the 5 tiers of the ‘Kingdom’ tutorials and the early missions of two other campaigns ‘Republic’ and ‘Empire’.
Here, for your delight, is a 3D pan of one city. As you will discover, it’s a question of fitting your city to the terrain:

The reason why 3 villas, those in the centre, don’t have a white rectangle in the middle of the roof is the bad placement of the theatre, which is preventing them from evolving. In this next 3D screenprint of another map, I solved the problem, while it demonstrates the paramount importance of building placement. Incidentally, a circus (Hippodrome in CIII) provides total coverage for your housing provided it’s not placed too distant.

This next screenprint shows the other way to set out your Patrician housing, all of which are at their Max level of Large Mansion, and is based on a horizontal lay out (Narona map).

Continuing with culture, let’s look at its needs, starting with entertainment. Odium needs workers. Theatre needs Actors guild. Arena needs Gladiator guild, which needs a regular supply of weapons. Coliseum needs gladiator or and Trainer guild, which needs meat from a farm. Circus needs a Charioteer, which requires wood.
Religion. Shrines need workers. Your chief shrine placement is Jupiter if you don’t want him to set buildings ablaze with lightning bolts, while some maps may require 2 of his shrines to keep him appeased. A Temple requires a slab of marble.
Security. As mentioned, walling your housing in, hence keeping the core population grouped together, as in the previous screenprints, helps boost security, while it’s only ever set high if you can wall in housing. See military below for more on security.
Maintenance, more so that of security. Like its predecessor, CIV has a Prefect and Engineer. Both, however, have a problem with regard to their workers. They are not bound by roads. That means, if you set up an industry, one cut off from your city for exportation of goods, the workers from the Prefect and Engineer buildings you placed to maintain the industry buildings will leave that area and go to other, sometimes distant, parts of the map. Incidentally, as with CIII, desert provinces, especially at the start, have a higher risk of fire.
Prosperity. As always, this is a measure of your housing quality while you don’t always need villas to achieve it, especially on small maps where forts are your primary need.
Favour – demands and requests. When Rome asks for something it will fall into one of these:
A demand or a request. Fulfilling a demand has no effect on your favour rating compared with that of fulfilling a request.
Don’t be put off if you are unable to fulfil a request in time and see your favour with Rome drop. If you have sufficient savings, simply send a ‘Large’ gift and favour will jump.
As to the gifts. If you send the same gift its effect will diminish. Also note, at the end of each year your current favour rating will reduce by 1 point.
Population needs no summarising, so let’s look at the core aspect of Favour: Rome’s requests. Military aid and Denarii aside, they can go from the easy to the totally ridiculous. On one map, I had a demand for weapons and had to import the iron to go with the wood I hewed. What made it a challenge was an impending invasion. The key is to use your judgement; sometimes you’ll get it wrong, most times, though, you’ll be there or there abouts.
Industry for Rome’s Demands, Requests and Export trade. Depending on resource placement, it is possible to set production for certain demands, requests and exportation away from your citizen’s needs production. If you can, be aware that you will need both a Prefect and Engineer building to prevent fire and collapse of such buildings (mentioned under Maintenance above).
I will now take you through the aspects of building a city, starting with:
Roads. First and foremost, they can be wound anyway you choose, while pre-placed roads are either horizontal/vertical or diagonal, depending on the camera view. The reason for this, although simple, is daft. Buildings can and may need to be rotated through all 8 compass positions (see next, after which I will come back to roads).
Building placement. The default is horizontal/vertical. If you press ‘R’ (the hotkey for rotate) once, instead of a straight line border around the building, clearer on housing size buildings, you will see a border like this: ^^^^^^^^. The only buildings that may need this type of placement are trading docks.
Roads and placement go hand in hand with one another. For that reason, study the position of any pre-placed roads; in particular, one that is too close to the shore and preventing the placement of trading docks. To delete a diagonal road, do it bit by bit, otherwise the cost will be greater.
How to proceed. You will find yourself saving the game quite a lot, especially at the start. Placing and deleting badly placed buildings can eat into your funds for later on. Since each of the completed missions are added to the 4 open play maps for you to play freely, save the Republic and Empire games as: CG?N (name of city) A1, etc. ‘?’ is either ‘P’ peace or ‘W’ war while ‘N’ is the mission level. So, your first save of the Narona map will look like this: ‘CG5P (Narona) A1’
It’s worth pointing out that the game autosaves every 10 minutes, while past autosaves after a certain time are auto-deleted. You can change those in ‘settings’. Placing a reservoir to see if water reaches the furthest villa, is one reason for saving the game, while it doesn’t need to cover the villa in its entirety.
Terrain. You can build over pebbles but not rocks or elevated parts of the map. The only things you can place over some elevated ground are roads and defensive walls. Non-timber trees will disappear when you place roads or buildings over them. That said, you may wish to save the game, clear all bushes from a given area and see what you can find and if you can place a building. If you can’t, part(s) or all of the building will be a mid brown colour.
A recently noticed and cost-free way to delete trees, bushes and pebbles, is to place one of your housing on it/them and then click the ‘undo’ button.
As well as timber trees costing you to clear them, while they must be cleared if they are in the way of a defence wall, otherwise the enemy can slip through the gap, it is best done with the camera zoomed in and the map tilted.
As you will recall from the ‘initial housing layout’ screenprint, 2 villas and 4 domas need to be placed first, along with their roads and then the additional housing. In missions where the population is high (the 10th peace mission = 6,000 while two others require 10,000) and you need all three types, a separate area with mirrored housing will be necessary (see mirrored housing for villas screenprint below). Also, on a map that is high in meadowland and has a population goal of 1,500, don’t be afraid to build over some of the meadowland. See note about the farms on Antiochia below.
Rotation. Each building has a front door to it. The last thing you want is it facing the wrong way.
For insula, you will see a yellow welcome sign at the corner and side where the door is. For Domas the door is on the side that slants in while villas have a pebble path leading to them. Why don’t I make it simple by showing you a zoomed in screenprint of them.

Prefect, Engineer, shrines, tax, barber (when available), more so than a clinic, will certainly need to be zoomed in to see how best to place them. My advice on this, and especially for all other buildings, is to play the ‘Djedu’ peace map, the other three (Amida, Corduba and Cyrene) being military ones.
Placement of resource, production and one storage building, along with a dock, are also important. For a dock, you will see two small mid brown coloured squares, which are the tail ends of the dock’s piers.
Trade. Exportation is your primary means of making money. Keep that in mind when you lay out your city and industry. Consult the world map (see hotkeys below) for what others trade and choose prudently. Too much at the start and you’ll run into debt, which affects your prosperity. On that note, I wouldn’t dabble with/change the wages you pay your workforce, while every Pleb and Equite is available for work. Consult your labour advisor from time to time, not just when housing evolves.
Exotic goods. Patricians will demand these in order to evolve their villas. In playing the game on normal difficulty, and so this may not apply on easy difficulty level, a quirk has been noticed. If a dock or trading post sells exotic goods and buys basic and luxury goods, they will not sell you exotic goods unless what they want is set to selling. Of course, you can set the amount of goods you sell to zero.
Storage. If you place an industry, one specifically for exporting, near a trading post or dock, then you may not need a warehouse for the item. To control what a warehouse and trading building hold, you have a sliding bar for each (see screenprint). The default for any such placed building is its maximum.
For a warehouse, there is a master control ‘Set All’ right at the bottom. Click on and draw the slider (currently set at the 24 mark) all the way to the left and all of the items will be set to ‘0’.
For trading buildings you simply draw the slider for each item to the left. To sell and buy, you need to depress/click the setting to ‘selling’ or ‘buying’.
Trading depots and docks only become available once you have opened a trade route to that city.

Granary and markets. Once placed, they will have a tick inside a square for all of the goods they can store and are available. If you want to export a good on the list and not make it available to your citizens, simply click the tick and none of that resource will be taken to that market.
Both a Food and Basic goods market let you set them to ‘Closed to Plebs’. I initially thought that was to set such an additional food market for your cohort’s Mess hall, only that is not the case.
Farms. How many? As a guide, 7 grain fields and 6 vegetable fields where enough to sustain a population of 2,800 in antiochia. Admittedly, I had an almost straight horizontal road between both types of farms (grain left vegetable right) with my housing roads and housing vertically some distance above the road.
Workers and buildings per resource and production. Each farm type can serve 2 of its resource while each resource building can supply 2 of its factories (more for clothing, while the initial wool takes a while to become available).
On maps where you have a high population count, 5,000+, it’s prudent to have a granary and food market for each food type, while you’ll certainly need to have a food market set to ‘Closed to Plebs’ for your Patrician and Equite housing, which also boosts your tax revenue.
All buildings, save for your 2 water supply ones and forts, need a road.
Water supply. Although placing both a Pump house and Reservoir are easy, joining them up, especially when they are not in a straight line, parallel to one another, and at some distance, can sometimes be frustrating. That doesn’t mean you should have them parallel, you just need to save the game before placing the aqueduct. If they are parallel, touch the mouse pointer (a finger) against the jutting out part of the pump house and click it, then do the same with the reservoir.
Mood. That of your citizens. Do not neglect your equites needs of a luxury good for too long. If you do, the facial expression on a domus, when you click it, will show as angry and red, and may well lead to them emigrating, leaving your city. For that reason, you should only have all of your Villas occupied late in the mission, as they evolve quite quickly. Green happy, smiling faces means they are pleased with your performance.
Debt. If you run out of funds and see the amount of Dnr displayed in ‘RED’ your prosperity will/ may plummet to zero. This can happen if you buy-off bandits rather than invest in either defensive walls or a couple of forts at the least, while on one map, invasions occur simultaneously and at two distant points.
Military. In keeping with its predecessor, military is land based (no warships). Fortification, however, is costly. Investment in a couple of light infantry forts will do to begin with, but you should follow that up with walls and towers later on. The two key points about them is:
1. You cannot place other buildings tight to them, or vice versa.
2. Place a tower first and then its road, as the tower overlaps the wall.
Towers and gatehouses can be rotated and mothballed just like every non-housing building in Caesar IV.
Light infantry require weapons (wood and iron). Heavy infantry also need armour (wool and iron). Cavalry need weapons and armour. Missile auxilia just need weapons.
This screenprint shows how to wall in a city that has a connecting area across water to it. Admittedly it’s truncated, but, nevertheless, it demonstrates what a city needs. Incidentally, although Domus need city walls to evolve to their maximum level, they also need 2 types of luxury goods. Note, holding back the second luxury good is a way of controlling Equites housing when your city is walled in.

Despite the city being walled in, two oversights can occur. The first is a small gap while the second is a damaged tower. As you will eventually discover (see below), that is a cheat by the game. Enemy forces can slip through either; therefore, after you have walled in your city, tilt the map to give yourself an overhead view and check along the city walls. Also check the sides of a gatehouse for a gap, noting that a gatehouse needs a road running to, through and from it. Nothing unduly long, mind.
If a tower becomes damaged, any large Domus, more so villas etc, may well devolve from the lack of a complete city wall. That, in turn, may also cause Villas that have evolved from having the city walled in to devolve as well. There now follows a montage of 3 screenprints showing how to replace a damaged tower.

Tower defences and how to use them. As mentioned, they can be mothballed, while tower and gatehouse defences may be all you need. That said, on the Narbo map, which the truncated walled in city screenprint came from, the invaders use grappling hooks to scale the wall, despite there being at least one tower placed along the longer wall. Towers and gatehouses also spawn archers. The way to use them is to follow the invaders, mostly cavalry units, around the map, turning off towers from where they have left and turning on towers where the depleted invaders are heading. You will find yourself having to use tower defences when, on a military based mission, Rome demands military support. As mentioned, fulfilling a demand has no effect on favour, while ignoring a demand can see favour drop by as much as 5 points, which you can get back, recoup by sending a small gift, something to keep in mind when military aid is demanded.
A quirk of the game is, towers, as noted above, can become damaged despite being constructed of stone; yeah, that surprised me also, considering the fact that mountains are made of stone as are some of Britain’s remaining castles along with the ‘Tower of London’. As you will later discover, that is just one of several cheats employed by the game.
Invasions. While an invasion is in progress no one will come to your city, even if the invasion is on a stretch of land that is cut off from your city by water and poses no threat whatsoever while all military buildings and prefect buildings will be unavailable to place on the map. Some invaders will have catapults. If you’ve seen the film ‘Gladiator’ starring Russell Crowe, you’ll know from the battle at the start of the film just how far they can reach. Cavalry units are your best defence against catapults.
In some missions, invasion points can be randomised. That means, having noticed where the invasion occurs, you re-load the previous game save and set or take towers out of mothball where you noticed the invasion point was, only to then notice, when the invasion occurs, it’s somewhere else. This is a formality of the game. All you then do is re-load the game, as many times as is necessary, and the invasion will presently occur where you first noticed it.
Dual and more invasions. Although you can be beset by 2 or more armies invading your city at the same time, the ‘Go there’ link on the invasion notice only takes you to one of the invasion points, after which, it closes. Pause the game after the map view moves to the invasion point, and scour the map's edges outside your city walls for more invaders. Note well, night-time invasions are the hardest to notice.
Strategy, especially how to repel an invasion of 160 British infantry with nothing more than strategically placed towers along the walled in city of Londinium, is for each individual player to work out. That said, you will find a link at the end of this article to an additional help page.
Cheats! Not so much you but the game itself, while I found it hard to believe until I witnessed it with my own eyes.
The game’s cheats are invasion related ones, hence the mention at this point.
First. Enemy units will head towards the weakest point of the city wall; mothballed towers, which you then turn on, only after you’ve turned off (mothball) towers from where the invasion occurred if you don’t have enough Plebs to man them all, which can be the case.
Depending on what the weakness is, you can use it to your advantage; draw the barbarians to a point of the map where your forts are stationed, backed up by a line of towers.
The most diabolical cheat, though, is when the enemy knows what you are going to do and can see you ready yourself for it. Hide cavalry units behind a forest of timber trees in readiness to attack siege machines and the accompanying infantry know you are there.
Be advised, don’t take too long in completing or continue playing some military missions, as, again, the game is geared to swarm you with ever increasing numbers to repel, especially when siege weapons are employed.
I also discovered why, quite unrealistically, I might add, a ‘tower suffers from neglect’, especially when the enemy forces are cavalry. Yes, you guessed it, it’s yet another cheat (see tower repair above), one that, as mentioned, gives cavalry units, in the main, a way into your city. Since you may and are likely to face that before the mission can be completed (lack of funds etc), here is the counter cheat and when to use it.
When, is the primary consideration, and the process is this: When you receive each of the two advanced warnings of an invasion, save the game. As mentioned, you will, either at the start or in times of conflict, find yourself saving the game quite a lot and none is more true of invasions. Obviously, if the game doesn’t cheat, then you don’t need the counter cheat, while the tower may ‘suffer from neglect’ after the invasion is over or as good as. If, however, it occurs while the invasion is on, thereby making your defences vulnerable, note which tower it is, reload the game and surround it in a wide ‘[‘ wall, one similar to that in the tower repair combo.
The counter cheat is this: press the return key and an input box appears on the screen. Type in the following:
denarii N
‘N’ will replace what your current denarii is. So, if you type 5000 in place of ‘N’ the amount of denaraii you will see is 5000. Note, the space between ‘denaraii’ and ‘N’ is needed in order for the counter cheat to work.
Low and behold, I just discovered another cheat, this time on the ‘Antiochia’ map. I decided that, rather than wall in the glass industry, I would leave it exposed and close it down when the invasions took place, using the plebs from it to provide workers for my city defence towers. Naturally, the desert raiders set fire to them, only when I checked my security rating afterwards, I was surprised to discover it was high, well above the goal of 40. After the last invasion, however, the one before I achieved victory, my security plummeted to less than 20.
Gotcha’. I finally caught that game cheat out. During an invasion, a tower showed signs that it was about to collapse, dust puffing out from its sides. No sooner was the invasion over; however, than the tower righted itself.
On the victory screen, you will, of course, see the words ‘you cheated’. Do not feel bad about it, if and only if, you used it as a counter cheat to that of the game, which, for me, is its only failure.
More cheating by this game. Having completed Antiochia, I took a stab at Moguntiacum in preference to its peace alternative, Ephesus, where the population goal is a staggering 7,500. Wow! Indeed. In April 127AD (keep a note of that), I yet again faced siege weapons, the usual small catapults plus an unused battering ram. Incidentally, you start with 50% more danarii than usual. Having knocked out my towers from a set range, the catapults began hitting my wine industry buildings, the first of which was 25% further away. Sorry, but, the catapults range is, was set by its distance from the towers. Anything beyond that would require it to get closer.
I solved that cheat, temporarily, though, by my additional bank of towers taking out the infantry that scaled the first set of walls and then set 5 lots of prefectures on the siege units. Having discovered that, when I come to replay the map, I’ll use the time, 2 years, to enlist 20 light infantry soldiers, while ignoring Rome’s demand for much-needed weapons, the cheek of it!
No, no, no! What is going on with this game? I did all that, only for housing, and only housing, to start collapsing, even after I re-loaded the prior game save and placed more engineering offices. I even, since my housing is on an island, placed a gatehouse and walls on the island side and then deleted and replaced the Engineer buildings. Nothing! Its as if they had gone on strike, despite my paying them a +2 wage to that of standard.
Bridges. Again, there are two types. Unlike CIII, neither one is as flexible as far as distance goes, so look for the narrowest point on a river (a long island on one map). You will certainly need to persevere when it comes to placing a bridge, while that is all the help I can give you on that.
Justice. You have two buildings that fulfil the needs of Patricians and it’s worth noting that a justice building increases your security rating. Incidentally, don’t be disheartened if an invasion causes damage to your city and Security plummets, as the rating will rise before your very eyes, especially with a ‘Forum’. Clicking that building displays your rating status. A Basilica, which is a form of courthouse, requires a magistrate from your personal residence. You also need a residence to draw a wage and pay for gifts that you send to Rome, thereby increasing favour, while your savings are carried over from one level to the next. You can only have 1 Basilica and 1 personal residence, the former needing to be kept in mind when the population and prosperity goals are high enough to require more than 6 villas.
Festivals. You can hold them, only what you need may not be available, while they are of little importance; certainly not as with CIII.
How to play both missions. When you complete a game (brought about by something other than the population rating, which you will invariably exceed), the victory screen will offer you the chance to continue. In order to play both missions you must click ‘continue playing’. You then save the game and, when you are ready, click the Review of mission button on the control panel and the victory screen will appear. Choose one of the offered missions and immediately save it with the game paused. Next, load the last save from the previous mission and repeat what I just said for the 2nd mission. The main reason for this is, you may find one of the two missions hard to complete, even on easy difficulty. If you didn’t save both you will have to return to the previous mission and replay it from your last save in order to play the alternative mission and the missions beyond that.
One mission that is best avoided is ‘Carthago’. So far, it is the only ‘ruined’ city I have come across. Although it will cost you funds to delete the buildings and reset the roads while exports of goods are aplenty, it has too high a favour rating, while some missions with a favour rating above 45 may be impossible to complete. In Caesar III, favour ratings of 100 are the norm.
NB. I have since and already revised favour and how it works – the things you discover as you play the higher level missions…!
Saving a game. Just last evening something strange occurred when I tried saving a game. Although I was able to delete the number of the previous save, the game would not let me type in the next number. To rectify the problem I clicked cancel and saved the current point as the previous number, thereby, in effect, overwriting it. I then quit the game completely and started it from the on-screen options. When I saved the game, to check it was working okay, it accepted the next number. Also note, if you see ‘Building the Empire’ on the screen when you load a game save and it stays there for longer than is normal, the game has, yet again, crashed.
Easily overlooked. Forgetting to turn on pre-placed support buildings once immigrants have filled up the house in relation to the type of worker, and, if nothing is moving, the pause button is on. You may sometimes find yourself having to click one of the three speed buttons rather than use the game’s ‘P’ hotkey.
Hotkeys. Compared with CIII, they are limited to ‘R’ rotate clockwise, ‘Shift + R’ rotate counter-clockwise, ‘P’ pause, ‘I’ Scenario information, ‘L’ Message log, ‘[‘ zoom in, ‘]’ zoom out, F3 World map, F4 Advisors, F2 go to city (having pressed F3 or F4), ‘Esc’ Options (save load), Space bar toggles current overlay on/off, and the cursor buttons to move accordingly.
Another quirk of the game is the fact that, although you can hew timber to make weapons, you can’t produce furniture with it. That said, you will have a different type of Luxury good available.
STOP PRESS! Indeed. In re-playing Narona, the fifth peace mission, Boy, did I do well! As these two screenprints show. First, is perfection. Villa housing at its Max-level of Grand Mansion and with all its support buildings laid out (circus not available) and secured with walls, while the second shows the final ratings along with over 4 times my starting funds! WOW indeed.


Some while ago, though, I achieved total perfection with this:

Exactly like that of the 'initial housing layout' screenprint above.
There now follows the two lists of building types in CIV, along with the amount of workers and, where applicable, the items they need. Note. Forts only require soldiers and not workers.

I also found the prosperity chart associated with housing. As with CIII, it is points total for all of your housing at the levels indicated, divided by the amount of houses.
You will note that, having Domus at their max level (city walled in), you won’t need as many medium Domus, and so the prosperity level is greater.
The thing to do is work out how many additional Equites, Domus dwellers, you need to fully staff each of the 4 Entertainment buildings above the Odium.
As a quick reference, 12 Large insula = 300, 8 Medium Domus = 200, 8 Large Domus = 280 and
6 Large Villas = 360. Medium Domus gives a prosperity rating of 33 while large Domus is 36.
6 Small estates = 600, a plus of 240. Medium Domus now gives you 42 prosperity, while Large Domus is 45.

That aside, how does one attain a moderate prosperity when the population goal is twice that of the average? And the answer is simple:
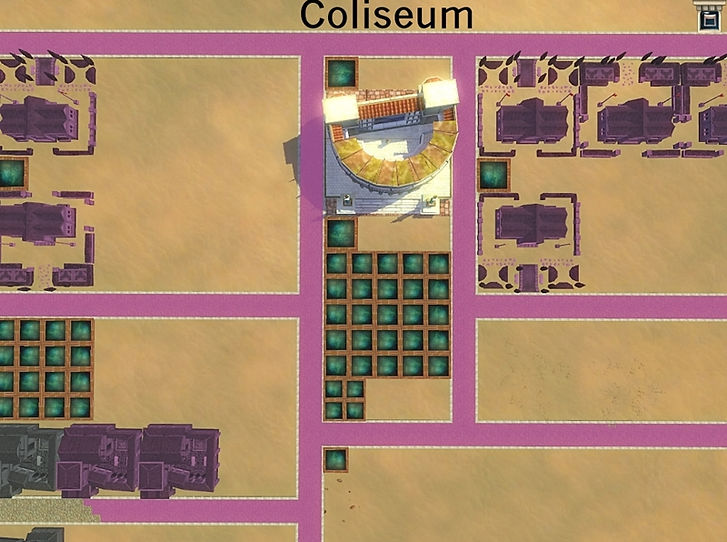
Mirrored housing! With the overlays showing theatre coverage, while the Arena, the exact same size as the theatre is the building below it, the pink lines show the theatre’s coverage – both sets of 6 villas. Not yet placed in that little explorative assessment, is the Coliseum, which will span the topmost road where I’ve added its name.
Tools, on the main menu, let’s you either produce your own scenario or edit one of the maps you have completed. Having looked at the ‘edit scenario’ I have no interest in creating my own scenario, while the only thing I suggest you alter on the ‘Edit scenario’ is the low starting funds, in particular, for scenarios that are military based or peace missions where you had to buy off raiders.
To do that, select a province from the list and click open. Thankfully, the ‘S’ (starting) tab screen is the one that is displayed. Under starting conditions, increase ‘Denarii’ and ‘Max credit’ to the amount you see fit (both amounts the exact same). Make no other changes to what’s there and then click the ‘Go to options’ button at the extreme top right corner of the screen. Click save and add the number 1 to the map’s title (‘Argos 1’ for example).
In playing the scenario’s, in particular, those you’ve edited, I would not bother with villa housing on maps where you need military buildings, for the simple reason that you are playing a scenario you’ve already completed, and so when you do eventually finish it, is something for you to decide; maybe even play the game on normal difficulty.
Now that’s odd, very odd, indeed. Although the scenario map I just edited is almost the same, the camera view image is different. For one, there is no river visible on it. Other than that and there being no rating goals on the introduction screen, it’s perfect.
Oh, oh. I spoke too soon. Although Rome’s demands are active, the same as that of the original mission, the date of the 1st invasion came and went, peacefully. And there was I, both sides of the river walled in and with tower defences aplenty.
I tested that on another military map! Excellent. No invasions. So, making those changes to what is now a scenario, produces a totally peaceful map.
Finally. The help and advice above goes hand in hand with the game’s booklet, which you should take the time to read through, despite the many valuable points mentioned in this article.
Thank you for reading. Game boy.
PS. Don't forget the additional link below. You never know, it may well come in handy. In fact, I'm pretty much certain it will!
To return to the 'Main ' contents page click 'Contents'.
To read the Caesar IV Add-on click 'Add-on'
To return to the Games 'Menu' page click 'Games'.

Contact us: the.irrefutable.truth2020@gmail.com