Caesar IV
Add-on
Brought to you by Game Boy!
Having now played as many as 27 missions, 7 more than that of Caesar III, and completed all but 4 of them, with, time will tell, how many more challenging missions there are to go, it’s noticeable that you may just need some help of the defensive kind in order to get to where I am, which is missions 11: Caesarea peace and Antiochia war.
Although they both have a low population rating, 2,000 and less, you will find yourself, as with others, exceeding that amount if you are to defend your city, moreover, in Antiochia where arable land is both small and sketchy.
Apart from Argos, the first of the Empire campaign war missions, where you also face siege weapons for the first time, invasion forces are cavalry and or infantry.
Cavalry units will circle your defences, looking for a way in, a tower that suffers from neglect.
If you have towers and tower guards, they will shoot at and deplete the cavalry units who may simply disappear. On the other hand, and most annoyingly, they will simply hang around at a standoff position, out of your tower defence range.
As mentioned, during the time that an invasion is on, in particular, one where your trade is by land, no one will come to your city. That means, if your denarii is low, you run the risk of your finances going into the red until trade continues, not that that is a serious problem.
Infantry units, on the other hand, are your main concern, especially at night when you can’t see them. Note, I play the game on my Aoc monitor, which has a lighter, unadjustable default setting than the standard one of my trusty Samsung. In addition to either bows or swords, infantry units carry grappling hooks, which they use to scale walls, in particular, sections that are defenceless. Although walls can be placed on elevated terrain, Towers can only be placed on flat sea level terrain. In fact, and it can serve a meaningful purpose, a tower doesn’t have to be placed on a wall, while it only needs to touch against a wall, in order for it to spawn tower guards who patrol the ramparts.
So, how, then, do you defend what, in essence, is an undefendable wall from infantry units?
The answer is in what they use. A one time assailing weapon. They can climb up one side of a wall and down the other. Once they are in, though, that’s it, no way out. Fight and die.
This first helpful screenshot comes from Burdigala. As with all of the maps it’s square or rectangular with one significant difference, that of a diagonal waterway going through the map, thereby restricting you to two triangles of land; the main big the other one small.
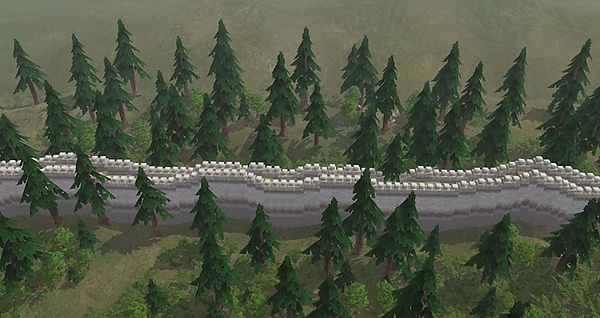
The first invasion happens on the far side, the smaller one above. For obvious reasons, no timber cutting industries are on this side, making it easy to run a wall in between the line of trees.
This next screenprint shows how to, later on in the mission, defend the unmanned walls;

There you go, a secondary wall built on flat, level ground, thereby creating a void, a trap in between both walls. I didn’t even need to place towers on it for the simple reason that the game cheats by knowing what I had done and why. A case of using the game’s cheat to my advantage and against it while not needing to turn off industry or have more insulas to man additional towers, especially as trade is pretty limited and towers are costly.
Of course, other cities are less compact than Burdigala, with resources, trade ones, and their industry exposed. Your primary concern has to be your city. Leave that exposed and you may as well give up as security gets knocked down to near zero. That’s in no way good when, in Ulpia Taiana, the security rating is as high as 70 while a rating of 100 is required in another mission.
For that particular map, Ulpia Taiana, I employed a trap I use when playing Age of Empires II where possible and effective. I call it ‘the corridor of death’. AOEII has two types of towers, which are placed behind and not on walls for good effect. There are two traps in this next screenprint; one clear and obvious the other not:

Infantry love scaling corners (see right side) and so I make it easy for them. Once they are in, though, they have to run the line, the gauntlet as it was known in the Clint Eastwood film of that name, of the towers and tower guards to get to the gap I deliberately left at the end. Incidentally, talking of gaps. See that wall on the left side, the one where, if I removed a section of wall the cavalry units could ride in? Yes, you’ve guessed it. Once the infantry have been delft with, leaving the remnants of the cavalry sat back and out of range, I delete a small section of wall and they ride down ‘the corridor of death’ to their doom and demise.
Towers that suffer neglect. When it happened during an invasion, thereby giving the bandits/barbarians etc a way in, I re-loaded the game save and placed a ‘[‘ wall around the tower (see repairing a tower screenshot on main, previous page). Low and behold, when I unpaused the game, a different tower to the one I surrounded suffered neglect. Only if it happens during an invasion, should you do that with all of your towers.
Walls and towers don’t just have to be perpetual as such. You can, and I have had to, extend a wall from a pre-existing wall, something like this: ‘|—’ with a tower on the extended wall.
The overall solution is this: Not counting maps which you can’t continue playing on, those where favour is high or you need to send more than three different exotic goods to meet Rome’s demands, wall in your housing, leaving farms exposed, and store up spare food in several granaries. The same thing applies to exposed non farm raw recourses (Iron, gold, timber, sand, marble & clay).
All you then do, is turn those industries off and transfer the workers to Towers and gatehouses.
That, basically, is about it, while the defensive tactics, that of using towers or not to your advantage, depends on how you set out and defend your city. Added to which, and from what you’ve seen above, you’ll come up with plenty of ideas, I’m certain of it.
To return to the 'Main ' contents page click 'Contents' below.
To return to the Games 'Menu' page click 'Games'.

Contact us: the.irrefutable.truth2020@gmail.com