
How to complete them on Grand Master level!
About 5 years ago, I downloaded the MS Jigsaw app via the ‘Store’, the white carrier bag icon with the MS logo on it that is pinned to the W8 and W10 Taskbar.
Two years later, and following an operation, one that lead to me taking it easy as I recovered from the surgery, I passed the time watching films, TV series I had on DVD and doing MS jigsaw puzzles, more than I had previously done.
Using my powers of observation, I found it moderately easy to do a lot of the ones I completed on the hardest level of 6: ‘Grand master’, while the not so easy ones I do on level 5: ‘Master’.
Completing a jigsaw earns you gold points. Completing a puzzle for the first time on a difficulty level, earns you twice the amount of gold points. The accumulated Gold points are used to purchase and download additional jigsaw collections.
In all, I have 47 collections. Of those, I received three collections to start with while some of the other 44 are ones that are ‘FREE’ to download from the store.
You can also create jigsaws from photos you have, either on a camera or on your computer. That said, if the image is Widescreen, horizontally or portrait, the puzzle creator will crop the area outside of its default limit aspect.
For this fun article, I recently took screenprints of the various stages that went towards me doing and completing a jigsaw on the ‘Grand Master’ level. It’s also worth pointing out the following:
1> I did the jigsaw on a 19” widescreen monitor, despite the fact that I could have connected my PC to a 24” widescreen TV.
2> Whereas most of the puzzles you can buy from shops and over the internet come with a photo of the completed puzzle on the top of the box, all you get with the MS Jigsaw app is a thumbnail, one that, when clicked, expands in the window:
Clicking it again minimizes it to the thumbnail.
Note from this point forward, where applicable, some of the screenprints have been cropped.
On some occasions, I found it beneficial to complete a jigsaw on a lower level and take a screenprint of it. Using the fantastically exceptional free app ‘PhotoScape’, an app that was used for almost all of the images in this Internet News Magazine, I cropped the sides (2 or 4) and copied the saved file to my XP PC, thereby giving me an image of the completed jigsaw to work from.
Although the information in the MS Store says that you can move multiple pieces, there is no explanation on how to do it within the downloaded app. All will be explained in due course.
To start. You have 3 trays for sorting the pieces into groups. Although you only see one to begin with, once you ‘drop’ a jigsaw piece inside it, a second tray appears below the first.
The key to solving a jigsaw is distinguishing three or more differentials in colour etc.
Look at this completed jigsaw:

With all those colours it looks hard. Look closer. You have three different elements. The two large lollies on a stick and two long twisting coloured ones on a stick plus everything else.
Next is the order. The two large ones in the first tray, the two long ones in the second tray and everything else in the third tray. Edge pieces, those that form the frame, are left on the board.
Consider this jigsaw:

That’s a lot more than 3 colours. The trays, though, are deep, enough to be able to get 3 different stacks in each; however, a problem invariably arises when you attempt to drop pieces in the middle of two, resulting in the drop being uneven.
UPDATE
I recently hit upon a foolproof way to simplify sorting and then moving the jigsaw pieces into the relevant trays, and that is, as will be seen in this next screenprint, to group the pieces together and then, with the board locked, move them into the tray(s).
Because of the size differentials caused by my zoom setting, the stacks to be moved into the middle tray are positioned to the left of those destined for the other trays.

Like that, when you empty the tray’s pieces onto the board, each group is in several easily manageable stacks.
For the purpose of separating two different stacks in a tray, you use ‘Move’. To accomplish that, once the tray is emptied onto the board, you need a degree of space in between the stacks.
Colourful paint is sorted as follows: 1 the fanned out samples and the brush top. Orange and green paint bottom. 2 Yellow and pink top. Red and blue bottom. 3 This depends on the difficulty level. On G Master, the silver rims will be smaller. Top is the remaining two paint colours, a dark grey and beige. Bottom is the silver rims (without a paint colour present) and the triangular gaps you can see between the pots of paint.
To make it easy, especially when it comes to viewing the pieces for sorting, you can zoom in and out. My preference for sorting is a setting two below zoom-in’s max, while, for clarity, I may sometimes change the setting to one les than full zoom-in.
There are two ways to change the zoom-in setting (full zoom-out being the default). Either left click the desired spyglass or rotate the mouse wheel (up for zoom-in and down for zoom-out).
The board. Until recently, I mostly did MS jigsaws on the ‘Pine’ background, which is no longer available (see Footnotes at end). Therefore, be careful when choosing a background. Avoid one that may clash with a colour in the jigsaw is my advice.
Lock view. This is primarily used for moving a group of pieces. Although you can lock the board when moving single pieces to a tray, the board view may move in the opposite direction (right to left).
Sorting the pieces. Start top right. Once you have moved all of the fully visible pieces to the trays (not those that are partially visible at the bottom of the screen), decide on the edge pieces, which can either be left until the end or moved in the direction of where they are destined: up, down, left or right. Do not move the right pieces to the extreme edge of the board. That’s because, when you zoom-out to position them they can become hidden beneath the trays.
For moving them as a group, which you will find yourself doing, keep the same pieces (left, right, top and bottom) together in a group (2 X 2) or rectangle (2 X 3 or more).
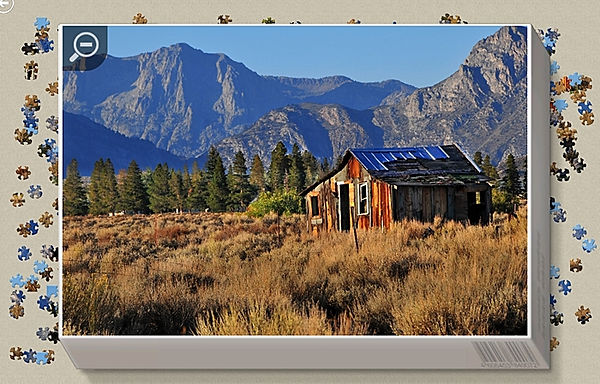
The rustic cabin puzzle, being the one I used for this exercise, has, as you will notice, (see next) three different horizontal parts.
Tray 1: Cabin top. The trees, including bits of the mountain, bottom. Tray 2: Sky, including bits of the mountain, top. The mountain bottom. Tray 3 is the brush. When dropping the pieces in tray 3, try to do it evenly (top, middle, bottom). That is also, as it should be, the order in which the three parts were done.
Most of what follows, excluding one special alien screenprint, are accompanied by few, if any words, the screenprints more or less speaking for themselves.
Moving multiple pieces. You will, when you reach the far left side of the board, something you will find yourself doing three times on the recommended zoom setting, have a group of pieces at the left side of the board.

Rather than stretch the mouse pointer from the left side with a jigsaw piece attached, you simply move the group from left to right, thereby making it easier:

To move multiple pieces, click ‘lock view’. Next, using the mouse, draw a wide rectangle around the pieces you want to move.
In this next screenprint you will notice that the rectangular area with the mouse button pressed down, is a darker version of the board while the colours on the captured pieces change.
In the main, having grouped the same destination edge pieces together, its easier to move them, especially with zoom set to its default.
The next Screenprint shows an incomplete capture of jigsaw pieces:

Grouped pieces moved:

Jigsaw pieces. What makes MS jigsaw puzzles different from most others is the non-formal shapes of the points and holes:

In addition to the same applying to the inner pieces, there are as many as 16 different shapes:

In all there are 5 groups. More recently, despite how the columns are laid out in what is a relatively old jigsaw, one I did over two years ago, the first 2 groups are laid out with the point of the following piece a 90 degree turn clockwise starting from North (the top). Next is a column of pieces with 4 points and a column with 4 holes. The fourth group, which has two consecutive points and two holes, are arranged the same as groups 1 and 2 starting with points north and east, then east and south etc. The forth group positions the singular hole the same as the points in group 2 (north, south, east and west).
That arrangement is only used when a lot of the pieces are the same; black in the screenprint and the brush for the ‘Rustic cabin’. Arranged like that, it makes it easy to look down 2 or 3 columns for the piece you want to place rather than a lot of disarranged pieces, something that, with multi-coloured jigsaws is more practical.
You will also note that the Screenprint confirms the existence of the now deleted, no longer available ‘Pine’ background.
With the frame completed, you need to hide it. Where you move it, top or bottom, is in contrast to where the pieces go – pieces at the top, hide the frame at the bottom.

Since the middle section of the puzzle is first, hide the frame at the top, sorting and putting the pieces together below it.
With zoom set so that the frame fits the width of the screen, move the board all the way down the screen. Next, move the frame up to the top so that only the bottom plus two of the side pieces are visible.
Finally, move the board all the way up to the top so that the bottom of the screen is visible.
Select, by clicking, tray 1 and it will expand onto the screen. Click empty tray. For whatever reason the stacks/column of pieces are further up the board, therefore, drag the board down and locate them:
Being an expert of sorts, the column is a mix of pieces compared to the advice given above. Additionally, in zooming in on the pieces in the two groups to the right, I added them to the tray as placed. The trays can be moved in all directions. This is something I use for placing pieces I find don’t belong with the group I’m working on.

Emptied trays also come in handy for storing one or more completed objects within a set size. That, of course, is dependant on the chosen difficulty level (the lower the difficulty level the bigger the pieces). For Grand Master level, the horizontal limit is 9 connected pieces while the vertical limit is 7 connected pieces.
Using ‘Move’, I separated the column into three easy chunks:

Chunks sorted into 3 groups: Cabin (left), Mountain and trees (top right), Trees + (bottom right).

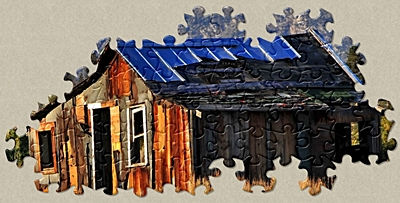
Using ‘Move’, I separated the cabin from the rest and put the pieces together:
Where possible, try and pair up as many pieces as you can. That will leave you with fewer options as to the remaining pieces while reducing the options; less pieces to compare.


In doing the Sky and mountain, the sky was done first. Again, where possible, try and pair up as many pieces as you can.
There are notably seven dark blue sections to the mountain, the largest of which is centre left (see screenprint of rustic cabin below).

Finally, the brush:

The tray includes pieces I figured matched with the dark parts of the brush and ones that were placed in tray 1 (cabin and trees).
As will be noted, there are two columns of the first jigsaw shape. This happens when there are a lot of pieces of the same shape. It is advisable to close up any gaps in a column. If you don’t, you may make the mistake of considering the gap to be the end of the column. Similarly, using ‘Move’, close up the columns when a column becomes empty.
Something I may do and did with the jigsaw I completed after the ‘Rustic cabin’ one, is to increase zoom in order to better see the shapes in relation to the next piece I’m looking for. Naturally, the 16 columns are too big to fully fit on the screen and so I drag the part completed jigsaw with the location vertically level with each possible column. By sheer luck, the piece that fits is at the top of the column (see red line on this screenshot):

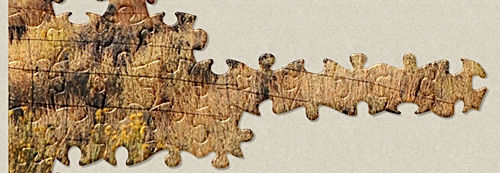
To the far left, there is a wire fence of sorts. To see the wire in some of the pieces, increase zoom to its maximum level and scan the columns to look for them:
Basically, that’s all there is to it. Just 1 piece to go!


Returning to the next jigsaw I did, one that had a lot of white hue pieces top bottom and left side, once I completed the top and bottom, I moved the remaining pieces from the top horizontal to vertically at the side:

Helpful tips:
While doing the large sky section of a jigsaw, one that was made up of blue sky, white and grey clouds and a mix of both (3 different types in all), I found myself having to do as much as I could of the blue sky, before switching to the sky and cloud mix. That left me with quite a lot of sky pieces, which, as with the clouds, the last of the groups I did, I grouped together as per their individual shape and moved them to an empty tray in order (left to right 4 rows):

When I came to complete the jigsaw, I changed the background (see previous screenprint) to dark green, thereby making it far more easy to distinguish where the remaining pieces went:

Footnotes:
Make sure you are ‘signed in’ before starting a jigsaw. If you start a jigsaw as a guest, but don’t complete it, you are likely to lose the progress point saved in the cloud. Meaning that, subsequently signed in, which the app may do automatically, you will have to start the jigsaw all over again.
To get around that, I hibernate my PC. Even then, returning to the jigsaw, there may be a problem with signing in.
Oh, no. Damn it. Yet again, having moved all the inside pieces to the trays, pieced together the frame and part sorted the contents of the first tray, when I returned to the jigsaw, I found that the cloud save, despite the fact that I was signed in, was the one before I completed the frame.
To resolve that happening, and as with any game that’s downloaded onto a computer, Microsoft need to introduce something that lets users of the app do that; save the game on their PC.
The same problem can also cause you to (temporarily) lose some of the collections you downloaded. Therefore, do not download jigsaws as a guest. Only as your signed in name, which the app gives you. Once you are signed in, you should see all of your collections, arranged alphabetically.
That said, and as I know only too well, some of the collections may be missing. To get them back, while it doesn’t work every time, I close the app and re-start it.
On the 15th of July 2021, an e-mail was sent to ‘casualgamessupport@microsoft.com’, outlining 5 of the problems with MS jigsaw, in particular, the removal of the pine background for the jigsaw pieces. Having remembered a 6th problem, a second e-mail was sent to ‘casualgamessupport’.
In addition to the 6th problem being outlined, the fact that the pine background had not been re-instated (that being the easiest of the 6 problems to remedy) suggests that Microsoft ‘casual games’ has utter contempt for its customers/users. [Added 17th July 2021.]
Success! I am happy to announce that Microsoft Jigsaw has acted on this article and points raised by re-instating the pine background. I, along with everyone else that do Microsoft jigsaws, hereby thank Microsoft for that.
Addendum to that. In checking my once again responsive ASUS PC, one that was reduced from £200 more than my Lenovo one, I noticed that the ‘pine’ board is not included in the available backgrounds.
Although due to a background conflict with the actual jigsaw I do, it rather looks like I’ll have to stick with the ‘Pine’ board and my Lenovo PC.
To return to the main contents page, left click the jigsaw piece below:
