
Reviewed by Game Boy!
Please note, all PC Games reviewed in this series are played by both men and women, boys and girls.
For what is my final review, I hereby present the exotic mysticism of the east. Ancient China and all its glory and pageantry.
As with Zeus, there are several campaigns, each one split into several missions. Each of the seven campaigns relate to and are centred in the reign of a designated Emperor.
As you play the missions, you can find yourself, almost as in Zeus, overseeing a settlement in another part of China, building splendid, well-designed and beautiful palaces and the like and sometimes defending your city from barbarian hordes; Genghis Khan’s Mongols from Age of Empires II come to mind.
In addition to the game borrowing from both Pharaoh and Zeus, there are some excellent improvements, ones you will find yourself having to use, especially when it comes to farms, orchards and their supporting industry as you make your way through the seven campaigns, from the humble bronze age to the mighty steel one.

I purchased the game on its original release. In addition to the game’s CD, the DVD case it came in also include a 60 page booklet on how to play the game, along with a highly-informative, double-sided fold out chart, neither of which are included in the ‘Sold out’ release of the game.
At some point, I typed out the necessary information from the charts onto two Word documents. That information, quite helpful to anyone who plays the game, appears at the end of this game-help article.
I also typed out the names of the ‘Open play’ maps, quite a lot of them, in fact. Later on, I downloaded an add-on from Heaven games. In addition to an eighth campaign, found under ‘Custom campaigns, I noticed three things. First, additional ‘Open play’ maps, second, I was now able to add up to three monuments to a chosen map. The third thing I noticed was, 35 of the game’s original ‘Open play’ maps had been deleted from the list of ‘Open play’ maps.
The names of the deleted maps appear at the end. I suggest that, if you want to download the add-on, something I highly recommend, you save as many of the deleted custom maps you want to play (some of them are slightly identical) on your computer. As always, I’ll explain how best to do that in a separate part below entitled: ‘Saving a game’.
The game. Emperor – Rise of the middle Kingdom.
As with Pharaoh, you are forced to place your housing around and inside a rectangular or square road complex. That’s because, it needs to be surrounded by Residential walls, which come in four colours. In keeping with the grandeur of the Administration City and Palace, my choice is always the red walls.
In addition to the walls adding to your citizen’s basic beautification needs, you also have ‘Grand way’ and ‘Imperial way’ tiles. These, as in Zeus, cover and extend 1 and 2 tiles of a road tile. Thankfully, you won’t suffer the problem from Zeus, whereby, when you save the game, only to find yourself re-loading a previous save, some road and ‘Avenue’ tiles are missing . You will, though, need to save the game quite often at the start, more or less before each action.
Feng Shui plays a part in Emperor as is to be expected. Positive Feng Shui shows up as a green ghost when you come to place a building and pale orange for negative Feng Shui. The same also applies when you click the ‘Feng Shui’ button on the Control panel, the long vertical tablet at the far right side of the screen.
For some reason, two things can effect the Feng Shui. Placing walls around housing, which should be pre-placed, and rotating the map.
All things considered, and I’ve played all eight campaigns, negative Feng Shui, which you will both encounter and have to accept, plays little part in completing a mission, all of which, as with Zeus, have goals for you to achieve in order to move to the next mission or complete the chosen campaign.
The first campaign, the ‘Xia dynasty’, comprises five tutorial missions. Be advised, where the game help suggests you place your housing in two of the missions is incorrect, especially considering the expansion in the second and fourth missions. That’s when farms and orchards become available.
Unrest, which can occur at the start, especially on difficulty levels above ‘normal’, requires a patrol guard from a Watchtower to quell it.
Fire risk. As always in these games, there is a risk of fire. However, not every building is a fire risk and so with those, there is no need to employ a ‘Building inspector’. The list of non-fire risk buildings appears at the end.
Of those, farms and orchards can be pre-placed, as can an irrigation pump. Each farm type needs crop tiles added around it. Food farms cover a 9 X 9 tile area, while orchards and hemp farms are 8 X 8.
Now comes the huge improvement. In addition to your being able to close down entire industries, you can now close down individual buildings. So, having placed a farm, simply right click on it and close it down. That is something you may well find yourself doing throughout each year, even more so when your crops are wheat and cabbage; there being a month between the end of one and the start of the other.
Food is taken in February when and if you hold a Chinese New Year festival. Therefore, and since you have no control of which food type(s) is(are) taken, you will find yourself storing food in individual warehouses. From there, providing the Mill for the stored food is set to ‘get’, Mill workers will get the designated food from a warehouse. There is, however, one exception when it comes to soya, bean curd as it’s listed in the mill etc. Mill workers will not get bean curd. That means, you will have to set the mill to accepting it. Be advised, though, where you find yourself later needing a second common housing block, and in addition to an Elite housing one already placed, the Mill workers may ignore the nearby warehouses and go to the more distant ones.
NB. That problem is solved with the update installed.
As you may also expect, the Zodiac calendar plays a big part in the game. That’s because, when the year of your chosen Zodiac sign comes around, you may receive special gifts. Anything from food or commodities to increased production.
It generally takes about four years for you to need a music school, the main requirement to hold a festival and so receive the ‘special gifts’. Furthermore, you can only guarantee it working in the first mission, thereafter, it’s down to luck as far as the remaining campaign missions go.
The way you guarantee it is quite simple. On the ‘Choose an Emperor’ screen, click ‘Create Emperor’. To the right of where it says ‘Select a name’ delete the name in the input box and type your name instead. There’s little point in choosing a different zodiac sign to that of the default one, and so click the ‘OK’ button, which takes you to the next screen. Click the ‘Historical Campaign’ button and you will see the list of the 7 campaigns. Since this is/maybe your first time, click ‘1 Xia Dynasty’, which just so happens to be the Tutorials.
The first, indeed, each mission is introduced with text and sound. While I’m here, the difficulty level you choose remains throughout the mission, in other words, it cannot, as with Zeus and the others, be changed in-game. As always, a higher difficulty level means buildings etc cost more.
Note down the name of the Zodiac sign showing at the top centre of the game screen. I have a different notebook for each of the city building games, something you’ll do wise to invest in for all the information you need to hand (what trading partners buy and sell, for one).
Once you’ve done that, quit the mission. Next, having consulted the order in which the zodiac signs come around (see 'Special gifts' chart at the end), go forward 4 signs down the list and do as follows:
On the ‘Choose an Emperor’ screen, click ‘Create Emperor’ and this time change the name in the box to that of your chosen Campaign, which, for this example, is ‘Xia’. Next, click the ‘Choose Zodiac Animal’ button and select the desired animal from the menu. To see the bottom six, left click the gold coloured arrow just above the ‘OK’ button. Finally, click the ‘OK’ button and proceed as before.
In four years time, provided you have a musical school, you will receive the offer of special gifts. One word of caution. Apparently, you can only receive food and commodities that you are able to harvest or produce. So, if you don’t produce any associated with the element tied to the zodiac sign, you should consider choosing one of the other categories of special gifts.
For your first time, I recommend you save the game In December, two months before the special gifts are due.
The five elements tied to the Zodiac animal, the name of which is left of the animal at the top of the game screen are: Wood, Fire, Earth, Metal and Water. Furthermore, they alternate, change every two years. (See chart at the end for more.)
The Water Table. Just as in Pharaoh, there are two terrains. Arid desert and lush grass. For crops, deserts require the use of a water pump combined with irrigation ditches, which are also available in some non-desert missions. When used in non-desert missions, they can double the yearly harvest.
By pressing the number ‘2’ hotkey on your keyboard, the water table below the surface of the map should appear as a series of blue tiles. If it doesn’t happen, you need to click the alternative ‘Water table’ button at the top of the control panel. Dark blue tiles are the best ones for crops. Lighter ones tend to show up around rocks and sand. Remember, as mentioned, food farms cover a 9 X 9 area of the map and water table. Be advised, because 3 road tiles lead into each farm and orchard, it may be possible to position one or more of the road tiles over one or more light blue tiles.
You will surely find yourself deleting shrubs and trees to make room for farms etc. Before that, see if you have a ‘Logging shed’, which invariably you will. As many as four types of buildings need wood to function: Tax offices and a Confucian Academy (pre steel age), a steel furnace and most monuments. Therefore, do not go uprooting trees that you’ll surely need for wood.
In arid provinces, once you’ve placed a water pump and turned it off, you then need to plan irrigation and roads into the farms while roads can be placed over a singular irrigation ditch but not along it. In doing so, and since a water pump also needs a road into it, do not place an irrigation ditch in such a way that access to the water pump is cut off. If you do, it won’t work.
Roadblocks and Residential walls. Oddly enough, and for their purpose, Residential walls, when placed over a road, turn into a gate and act like a roadblock; a controlled roadblock. Gates are used to control where three types of walkers can go. Building inspectors, Religious devotees (4 types) and, lastly, peddlers from the market square’s shops; 4 for common housing and as many as 6 for the elite housing. On the subject of that, you will, when you need both types, and there is the space on the map, find you’ll only need the Grand market square.
With all that I’ve thus far mentioned, it’s time for some very helpful screenprints:
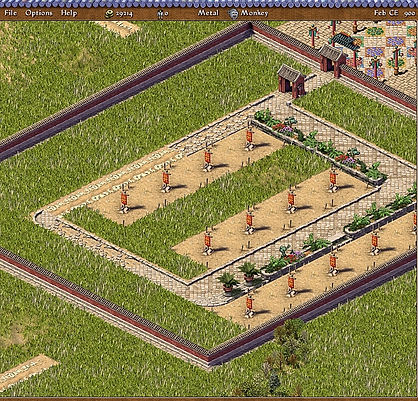
To place Grand way & Imperial way tiles, missing from two adjoining sides of the complete rectangle in the screenprint above, simply left click and drag the mouse along a strip of road.
In addition to 2 x 2 aesthetics going in between two of the inner pairs of vacant common housing, there is also space for walker buildings. Religious shrines in higher level campaigns and none bronze-age ‘open play’ maps.

By clicking on a gate, a notice, one that allows you to give access to one or more of the three previously mentioned walkers, appears. For housing, it is always and only the market peddlers. Furthermore, and with the walls for the elite housing being pre-placed, until you have need of the elite housing, the access gate to it needs to remain closed to all three walkers. Note, just don’t forget to change it to ‘Market employees’ access when the time comes. Roads outside the housing need access for building inspectors only. in particular, patrolling the ‘Market square’. Be vigilant of spies, though. More on that later.
Industry. Your chief concerns are salt mines and clay pits. Salt mines need to fully cover salt deposits, which show up as white on the mini map. Clay pits need to be placed so that one of their tiles is over a dark blue water table tile, sparse in deserts, while the Palace and Administration city need to be placed so that at least 1 of their tiles covers a blue tile. One other thing, some industries require two resources in order to operate. A bronzeware maker needs bronze and clay. Others you’ll discover as you play the game.
Changes for the good. In some missions, as well as ‘Open play’ maps, you will, as I discovered, find yourself making changes to fortifications – towers, city walls and gatehouses – to accommodate your housing safely inside, while on one expansive map, you will, on your return, have to construct two more monuments, one the tomb of the Terracotta army.
Fishing. The game and its quirks will baffle you just as it did me. Place a fishing quay directly near a fishing area, then watch the fishing boat make its way to a distant fishing spot. The same can also apply to game hunters and their prey.
Spies. These cost money and play an important part in the game. Unlike all of the other city building games, most other cities are private as to what they trade. Invariably, you will have to negotiate with one or more for a trade agreement, sending them something they need in return. To find out what they trade, you send a spy to their city. But, wait. There is a cost effective way to do it.
Save the game just before you send out your spies and to as many neighbouring cities as there are and you can afford. Once your spies have gathered the information, note it down in your book and decide which ones are the best to trade with; land trade better than sea trade. All you then do, is reload the previous save and use the trading information to open trade agreements. It’s the only way to make money in the game and achieve treasury goals for a mission.
Other cities, of course, will send a spy to your city. They are identified by being out of place. A religious walker outside your housing block(s) for example. To unmask a spy, right click on the out of place walker.
Religion. This takes on a dynamic in Emperor. In all, you have four religious persuasions. Ancestral, which is basic needs, plus Confucianism, Daoism and Buddhism. Furthermore, each one has as many as three ‘heroes’ as they are referred to on the chart. Said heroes can visit your city for a length of time, while some mission goals require you to have a hero present for a set amount of months. To summon them, as such, you have to send them a commodity. The best one for that is pottery, which you need to produce from the start while holding back on a ceramics shop.
Note there is a specific way to set out religious buildings etc, either when you have a grand market square serving both types of housing or require a lot of elite housing from the iron age.
Using the ‘allow access’ options on a residential wall that is a gate, you simply place a gate at the end of the elite housing and place the religious and entertainment buildings, along with an Inspector’s tower, beyond the gate. See the following screenprint which has two Tai-chi parks in place of two elite houses.

In using the Xianyang open play map, the Tax office goes in place of the ‘Round wayside’ while the Confucian academy etc go along and either side of the road that extends to the right of the Dao and Buddhist buildings.
Helpful points: A fort, the Administrative city and Palace, along with rectangular monuments, can be rotated. In rotating them, they may flip oddly; for example, not going where they should. To prevent that from happening and at a specific point, pre-place a road tile.
Canal: Not so much a monument, but, along with the great wall of China, you will find yourself having to build part of a canal and in more than one mission and campaign. They need labour camps to remove the earth, and stone for the edges and base. You should have at least one stone quarry on a Canal monument map. If you have two, then, excellent. You will need to produce stone while the labour camps are working. Since they start at one point and finish at the opposite end, keep those near the current worksite on and the others off. Similarly, turn labour camps off when they are not needed, usually when carpenters are building part of a monument, the Great wall going up in stages of several levels. For a ceramicist, and so that the clay isn’t taken to a kiln, you should remove a road tile from any connecting road to your city.
Wild animals. A Palace’s menagerie can house wild and tame animals. Some missions require you to have a certain number of animals in your Palace’s menagerie. Although Nu Wa can capture animals, she isn’t always present in Menagerie goal missions. To accomplish a large goal, you will need to send the off-spring of an animal in your Palace’s menagerie to another city. (See note at end.)
Of the six main animals, Salamanders are mildly dangerous. Your best defence against them is a tower. Alligators can roam anywhere while walls are costly. Most effective is an infantry fort.
Defence walls. Although ‘City walls’ as they are named in Emperor can only be built one deep, there is a solution to that. You can only place a single square of wall in front of a length of wall. Having done so, you then place a long wall the other side. The screenprint that follows shows the walls in all their glory along with flattened grey squares with the number ‘3’ hotkey pressed. In order to reduce the height of the combined screenprints, I rotated each one prior to cropping.

Gatehouses: These have to be placed over and not adjacent to four city walls, one that has a gap in the middle for a road. You don’t, though, need an actual road tile, three of them. Only Towers that are not connected to a city gate need a road connected to them, while a tower on a wall that is connected to a city gate is deemed to have the road connected to the city gate. Also note, Towers and gates are two of the buildings in your city that cannot be turned off individually. To turn them on and off, click the ‘Manning’ or ‘not manning’ button on the military tab (hotkey 9) of the Control panel.
Entry point. As with Zeus, it is prudent to establish the entry point, especially on moderate to big size maps. Along a length of road place three common housing plots on either side. On the ‘Options’ menu, increase the game speed to 90% while also changing the scroll speed to 30% and see where the immigrants enter the map from.
Taking all of that into consideration, if you find yourself having to place a market square at the opposite end to the entry point, it may be prudent to place a ‘Residential gate’ at the other end of your common housing block.
The desirable game speed at the start is 10%. When you are set up and ready for immigrants to come to your city, increase the speed to 30% for the tutorials. Then, when you feel comfortable, increase it to 50%, that being my chosen game speed.
Another improvement on Caesar III and Pharaoh is the ability to delete pre-placed roads and place new roads and buildings with the game paused.
Starting workforce. Because of the varied starting dates of food crops, you may need more workers than you have, especially if your housing is distant to the entry point, which can happen. By increasing wages, you will gain more workers. If it becomes necessary to do so beyond the start of the game, increase tax to the same level. Be sure to have a tax office and Administrative City.
Open Play maps. There is more to them than you may realise. Bronze age. As you’ll discover from the Xia campaign, bronze deposits are used to produce bronzewear for your elite citizens, however, bronze and copper deposits are not present on every map. Lacquer from lacquer trees is one of three orchards, the others being Mulberry for silk and Tea. Lacquer is available from the iron age and tea the steel age.
So, having chosen a steel age start, change ‘Non-player relations’ to Peaceful’ or ‘Harmless’ and ‘Disaster frequency’ to ‘None’. The reason for the first is that without iron to produce weapons you won’t be able to defend your city, thereby shortening the selected game. Next, click ‘Random City’, which brings up the start of the list of Open Play maps and Left click one of the names. Not Random City, which selects a map at random, and then left click ‘To the City’.
On the agriculture section of the control panel, see what crops and orchards you have. Ideally, you want a mulberry orchard and three crops, wheat and cabbage if possible, while you may find you have as many as five crops and one or both of fish and game meat. If you don’t have at least three farms and two orchards, quit the game and repeat the process. As you may well note, the crops etc are different to the previous. In that sense, don’t always accept what you are given, while avoiding being too picky. Tea you can do without. Make sure you have lacquer as well as mulberry and at least three different crops of food.
Open play maps and the Zodiac animal. For the open play maps, it’s prudent to type the name of the map into the ‘Create an Emperor’ box. As to the Zodiac animal, the one present, top and centre of the game screen, is the same for each map associated with each age. The zodiac animal you need to select for each age is: Ox = Bronze, Rabbit = Iron and Rat = Steel.
Saving the game. For the Campaign missions: ‘Ep1’ for the first mission followed by ‘A1’. So: ‘Ep1 A1, followed by ‘Ep1 A2’ (change the number at the end with each save). If as you may, need to go back to and load a previous save, when you come to make your next game save keep the next number but change ‘A’ to ‘B’. For example. If you loaded game save ‘Ep1 A4’ your next save will be ‘Ep1 B5.’
Since open play maps have no mission goal(s), simply save the one you are playing as ‘A1’ etc.
Gifting an animal to another city. Obviously, you don’t want to send the off-spring of an animal that a city has. Although, as mentioned, there are two main climates, desert and non-desert, there is, in fact, three. Humid: Tiger/alligator. Temperate: Salamander/Panda. Arid: Bear/Vulture. That said, there are other types of animals. You send an animal to another city in the same way that you send/sent wares to open an agreement: ‘Give a gift’.
Food quality table: Bland = 1 food type. Plain = 2 food types, or 1 food type + salt or spices. Appetizing = 3 food types, 2 food types + salt or spices, or 1 food type + salt or spices. Tasty = 4 food types, 3 food types + salt or spices, or 2 food types + salt and spices. Delicious = 4 food types and spices, or 3 food types + salt or spices.
As the necessary food quality increases, you need to change it in the market square. This lets you control your housing level, thereby avoiding more available workers than you have jobs for them, while the increase in population will naturally increase the need for food.
Evolvement of housing: The presence of two heroes can evolve your housing, when that happens, it’s advisable to add the ceramics shop to the market square while you only need an Acupuncturist if you have a working Acrobat school.
Basic housing buildings. You need the following placed and working: Building inspector, well (common housing only), Ancestral shrine and herbalist. You will also need a music school, while for an Ornate apartment you will also need an acrobat (3 X 3) and an Acupuncturist. The lack of a tax office only effects your ability to gather taxes.
Buildings that don’t need an inspector: All types of farms and orchards, Hunter tent, irrigation pump, ferry crossing, City gate, Fort and tower, Aesthetics, labour camps and artisans.
Hotkeys. The following list of hotkeys will come in useful:
1 = Population and housing, 2 = water table and agriculture, 3 = industry, 4 = storage, distribution and trade, 5 = safety and health, 6 = Government +, 7 = entertainment, 8 = Religion, 9 = Military and defence, 0 = Aesthetics, ‘-‘ (minus button right of ‘0’) = monuments.
Others: P = Pause the game, R = Rotate building, Z = Hazards – Building inspector.
The names of the ‘Open play’ maps that will no longer be listed and available when you install the add-on are as follows: MP21, MP44, Badaling x 2, Handan x 2, Haunxian, Jiayuguan x 2, Juyongguan x 2, Liangzhou x 2, All of the MP canal and MP wall maps, Shanhaiguan x 2 and Yangzhou.
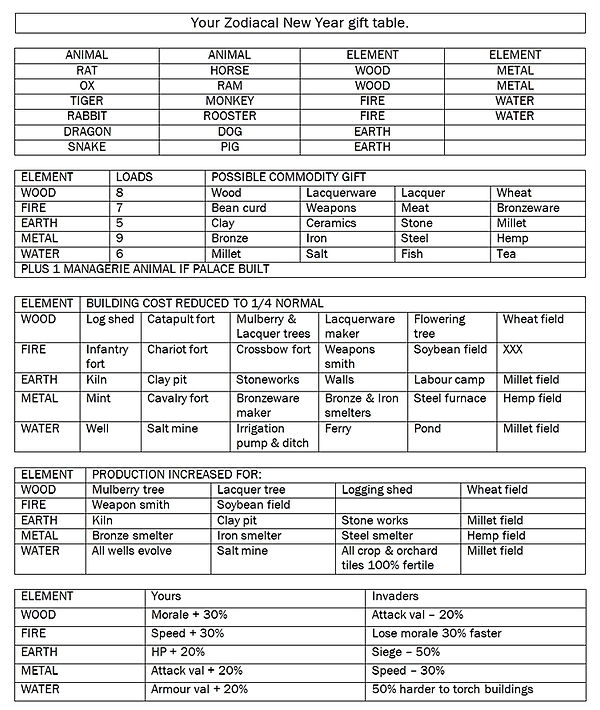
The following table lists the special gifts in relation to each of the five elements:
To return to the Games 'Menu' page click 'Games'.
To return to the 'Main ' contents page click 'Contents' below.

Contact us: the.irrefutable.truth2020@gmail.com