CAESAR III
Reviewed by Game Boy!
Please note, all PC Games reviewed in this series are played by both men and women, boys and girls.
See end for an exciting update!

Central Italy, seven hundred fifty years before the birth of Christ. Starting on a path that would lead further than they could ever have imagined, farmers settled at a place on the river Tiber. They called it Rome.
It thrived, building legendary roads, encouraging trade with neighbouring cities. Life was good, but Rome’s citizens hungered for more and developed mighty legions to conquer new lands. The Empire grew stronger. None could thwart Rome’s destiny.
Defeated captives became slaves, bought by rich citizens who enjoyed Rome's unrivalled civilised life. But not every citizen lived in such luxury, leading to riots by the hungry and the poor. But Rome thrived, leaving, as proof of its glory, spectacular venues full of tough, often dangerous entertainment its people demanded.
Immerse yourself in one of the wonders of the past as you govern as many as 20 Roman provinces in your rise up the ranks, from a humble citizen to the next Caesar. Additionally, play one of the many construction kit games and even create your own with the easy to use map editor.
Be advised, this city building game can only be installed and played on PC’s with an operating system prior to and including Windows 7. It may be possible to install and play it on Windows 8, and only after you’ve installed either Zeus or Emperor as I discovered.
Where to start with this? Certainly not the two unhelpful tutorials, that’s for sure!
I received this game, along with several others, with my first PC. Frankly, when I tried playing it, I was at a total loss. Houses were evolving to villas only to devolve back to insulae.
The game isn’t so much complicated, but hard to get a grip of if you don’t know what to do. Thankfully, I’ve managed to complete all but the final peace mission while rising through the ranks to Caesar with the last military mission. In effect, the only way to win the final peace mission is to make an alteration to the programme, thereby solving the game’s housing problem, one that Sierra managed to address from Zeus onwards.
Housing isn’t the only problem. You need to contain localised walkers within a housing block, and, if that was not enough, cut off, segregate the Patricians from Plebs in order to control housing as mentioned above.
Patricians are villa and palace dwellers. Although they do not contribute to your workforce, they pay a higher amount in tax. Villas, which can evolve to palaces, require wine. Therefore, in order to prevent markets distributing wine to the Pleb section of your city, the two housing types must be cut off from one another prior to evolving what, in effect, is a small amount of Pleb housing to Patrician villas.
Although the tutorials only require you to achieve a population rating, thereafter, in order to win a mission, you need to achieve or surpass 5 ratings: Population, Culture, Prosperity, Peace and Favour.
Culture. This is a measure of Religion (temples to 5 Gods, which come in 2 sizes), Education and Entertainment.
Prosperity. Although, in many respects, it’s a measure of your housing, it is more than that and can be affected, both negatively and positively, by the smallest action or point.
Peace. This rating controls the length of the game. To achieve a peace rating of 39, you need to play 9 game years, and then not suffer any riots or damage to your Roman province, other than military fortifications, by invasions.
Favour. By sending Caesar an annual gift, paid for from your personal earnings, along with meeting his demands for goods and troops in a timely manner, your favour will increase.
Invasions. Despite the so called ‘peace missions’, all but one of them, from Miletus onwards, will see your province suffer minor invasions from enemies of Rome.
Choosing a mission. At the start of each career level, after the second tutorial, you are given a choice of two missions; one peaceful the other military. It is possible to play both and still keep your rolling salary from the previous missions. The way to do it is simple. Where possible, make the population rating the one that wins the mission. Keep an eye on the population count at the top of the screen and save it periodically as it ticks towards victory. Once you’ve selected the next mission and subsequently saved it, load the final save of the previous mission and select and save the alternative mission.
To get a feel and understanding of the game, beyond that of the two unhelpful tutorials, and so you can see things for yourself, once you’ve read my helpful advice and tips play the Valentia ‘construction kit’ game (see end).
The housing problem, which is where it all starts for any province, depends on one factor alone. Can your city either produce or import olive oil? If it can’t, the solution to the housing problem is irrelevant.
Your level of housing, as mentioned, is tied into your prosperity rating. Each type of dwelling, be it a small tent right up to a luxury palace, has a prosperity value. At the end of each year your housing is evaluated by adding up all those values and dividing it by the amount of dwellings you have. The problem is best demonstrated by a screenprint:

As you will note from one of the overlays, housing plots need to be two deep from the road. Furthermore, in order for houses to evolve beyond medium insulae, they have to be 2 X 2 (4 houses) or a solid 2 x 2 (1 house spread over 4 tiles of the map). Some of the housing plots in the screenprint show as 2 x 1. This is no good if you have a high prosperity rating. The solution, however, is very simple and I have set everything out as it will be in this truncated screenprint:

Although some of the groups show as 4 houses in a 2 x 2 square, once they receive olive oil and two amenities, they will evolve to large insulae. As soon as that happens, you simply delete the small statue (shown as a garden in the screenprint) and the three houses around it will likewise evolve to large insulae. If you can provide your citizens with two types of food, something you need for villas, then by providing the pleb housing with a second food type and a Colosseum, large insulae will evolve to Grand insulae, which have a higher prosperity rating.
These next 2 screenprints of two MS Word Tables show the main 2 housing block layouts. Note that, on a non desert province, a single fountain provides water to both sides of the road (see later). Abbreviations: F = Fountain, P =Prefecture, E = Engineer, D = Doctor, B = Barber,
TE = Temple, Mkt = Market, W = Well, GH = Gatehouse, MS = Medium statue, S = Small statue.
In the rectangular block, green squares = gardens and the blue = Aqueducts between reservoirs.
In all, there are 20 Large insulae in the long one and 25 in the rectangular one.
Although not present in the first graph, a medium statue has to be placed behind each of the sets of housing plots for beautification, while prior to that, the roads (coloured red) in each housing block need to be covered with plaza tiles.


A note on entertainment. The right end of the first graph, beyond the GH (Gatehouse) should not be connected to your city. That is where the buildings for your 3 entertainment walkers go. Thereby, in effect, forcing them to walk past the housing to their destination building, which is beyond the left side GH. With the lower graph being a solid rectangle, Actors will walk around the circuit, while you need to drive the Gladiators the same as the long one – right to left.
Let us look at the main two ratings in greater detail, starting with Culture:
Temples aside, there are 7 main culture buildings; 4 entertainment and 3 education. Not counting the hippodrome, which you can only have one of, and apart from the Colosseum and Academy, you can and will likely need several of the others in order to achieve the culture rating. By consulting your entertainment and education advisors, you will note that a single theatre serves 500 people, an amphitheatre serves 800 people, a Colosseum serves 1500 people and a library serves 800. As for schools and Academies. Although each one serves a set amount of children and students, the overall total is based on a census, one that is taken at the start of each year. In that sense, as you move towards the end of the mission, especially when the ratings are high, you not only need to keep an eye on things, but you also need to consult the education advisor (press 8 on your keyboard). Ultimately, the game is all about timing, especially in the higher level peace missions where prosperity is high.
Unbeknownst to those who play the game without the following information, prosperity, the year on year score, is affected in several ways, ones that can be easily overlooked. In that sense, as I will now explain, it’s not just your overall housing that can alter it; down as well as up.
To start with, housing devolving for one reason or another. That said, and provided you can resolve the matter before the end of the year, it won’t be your housing level that affects it. That is when you are awarded points to a maximum of 10, based on the following criteria:
Holding on + 2 points. Making a profit + 2 points. 10% or more of your population live in villas or better + 1 point. Less than 30% of your citizens live in tents or shacks + 1 point. Active hippodrome + 1 point. Less than 5% unemployment + 1 point. At least one Grand insulae or better in your city + 1 point. You pay your workers 2Dn more than that set by Rome + 1 point.
Note. There will be times during the odd mission when changes occur to wages as well as trade, therefore, keep that last part about wages in mind.
Negative aspects: City loses money - 1 point. Note, the cost of construction is not included; after all, without buildings your city will never get off the ground. Unemployment is above 15% - 1 point. You pay your workers less than that set by Rome - 1 point. You go broke and Caesar bails you out - 3 points. Failure to pay tribute (not having enough funds) - 3 points.
Accepting the positives while not including Villas and a hippodrome, you could accrue 7 or 8 prosperity points a year; however, your average housing value acts as a cap.
Housing. Realistically speaking, you actually have 3 types of housing. Tents, those outside of housing blocks, which provide initial workers for farms, industry and entertainment buildings (depending on your housing layout). Next, the core pleb housing, which provides additional workers for your city and whose housing can rise from Tents to Palaces, but should not exceed Grand insulae. And, lastly, patricians. Their housing needs to rise from tents to villas and, depending on the prosperity rating, palaces.
Now comes the bad news and how to deal with it.
A large insulae and a grand insulae both house 84 people. This is where both planning and timing are of the utmost importance where villas are concerned. As soon as a grand insulae evolves to a small villa, the occupancy is slashed to 40! None of who work. Incidentally, a population of 230 gives you 100 workers; 10 for every 23. The thing with Villa evolvement, is to do it quickly; from a small hovel (room for 13 people) all the way up to a small villa. That way, the loss to your workforce isn’t as effective as that of a grand insulae with 84 people in it while you only need 2 small hovels at the very least per patrician housing:

The table above shows the layout for Villas (top) and Palaces at their highest level (bottom). Although I include all 5 temples in my pleb housing, Patricians only need 3. Two solid villas and one palace (pink) are flanked by another of each showing the original 2 houses. Due to their size differentials, you will need to reposition some of the support buildings; Baths facing the school for villas. Other than LS = Large statue, refer to the abbreviations for the pleb housing above.
There now follows a table that lists the levels of housing, what they have, the maximum number of occupants and their prosperity level.
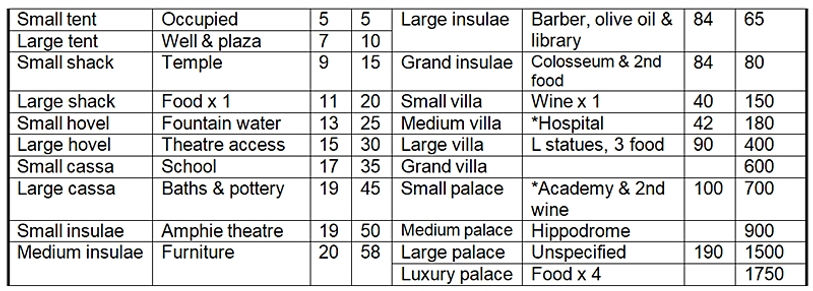
For some reason, the facilities marked with a *may differ as to when they are needed, while palaces require Large temples. Also note, patrician housing fills up slowly and should, therefore, be placed near the entry point to your city. The entry point is marked with a red flag while the exit point is marked with a blue flag.
Two things to note in that regard. 1) If you block either point, essentially the road to Rome, whatever building is blocking it will be destroyed. Watch out for trees blocking it if that happens.
2) If you place housing on a stretch of land, one that is entirely separated from the pre-placed road by water without first placing a bridge, the housing plots will be removed.
Bridges. There are two types of bridges in Caesar III. A ship bridge, one that is used to span water where fishing boats and a dock are in use, and a low bridge. Be advised, they can span quite some distance.
Fishing. Seagulls indicate where fishing is possible. You first need a shipyard, which builds a fishing boat that is sent to a fishing wharf.
Sea trade. Before sea trade can commence, you need a dock. Look for pinkish brown flotsam in a stretch of water, especially if you have more than one outlet.
Food types. There are, as mentioned, 4 food types in Caesar III: Wheat, Vegetables, Fruit and Meat. That is also the order of preference for your population. No province can produce more than 3 food types, meaning that, for Luxury palaces you will need to import a 4th food type.
In missions where you have two types of food, fishing and farm, you may have to provide the farm food to one or two housing areas and fish to other parts of your city. Plan well and you shouldn’t have a problem keeping them segregated.
Second type of wine. This can be done in several ways, depending on whether you can grow grapes or not. If you can’t grow grapes, chances are you will be able to import grapes from one city and import wine from another. To avoid having to actually accept and pay for the 2nd wine, you need to import the grapes and produce wine for your patrician housing long before you evolve their housing to villas. When you need to import the barrels of wine, you simply set every warehouse in your city to not accepting wine. It’s the fact that you have a trade route open to import wine on the trade advisor’s section and set to 1 or more that triggers the fact you’re supplying a 2nd type of wine to your patrician housing, despite the fact that you’re not.
Be advised, in missions where you have access to all 4 commodities and you can sell wine to other Roman cities, then, provided you do not evolve housing to Grand insulae level, market traders will leave off taking wine.
Trade problems. Despite setting a warehouse as the main trading post, land traders will take the goods they want to buy from any warehouse that has them. For sea trade, you should place a warehouse near the docks for the goods you buy and sell by sea. Also, as soon as you open a trade route, all warehouses are set to accepting the goods they sell. It is, therefore, important that you visit all of your warehouses and change the settings to not accepting for those warehouses other than any that you want to accept imported goods.
Yet another quirk of this game is the fact that, although you are actively accepting goods from other cities, they will only let you have a limited amount of them in storage, after that, they simply stop selling them. The main problem arises if they are finished goods, excluding wine, which I just now covered. Furthermore, if you need to evolve housing to Villas, you need warehouses full of finished goods: Pottery, furniture and olive oil, so that you can close some, even, all of those industries down. There is a simple solution to that:

All walkers provide their services to houses and buildings that are within two tiles of a road. Once the warehouse above has been filled, in part or whole, with a finished good you are importing, you simply delete the road tile that connects it to the main longer road and it becomes inactive while its contents is not registered. Oh, and you also gain the 6 workers that otherwise run it.
Province climates and their varied effects. There are three climates in Caesar III. Northern, cold, thereby a low risk of fire, dark green grass with the added danger of wolves. Central, epitomized by a welcoming lush green. Desert province, increased threat of fire while fountain coverage is reduced by one tile. It is claimed that wheat farms in a southern province produce twice as much as the other two, only there is no distinguishable southern province by name.
Wolves. In most northern maps they can be killed by slowing the game down, walling them in and then, when you have enough people, placing a tower over a 2 x 2 section of wall. In one map, for you to discover, you simply wall them out of your city while in another map they spawn.
Water supply. Your citizens need water. There are two types of water supply in Caesar III. A well provides basic water to 2 houses on all sides = 5 X 5 area. A fountain, however, is your main source of clean water. Fountains, along with baths, require a working reservoir. In most cases you will find yourself having to connect two, sometimes more, reservoirs together with aqueducts. The main reservoir needs to be placed in close proximity to water. Whereas a reservoir can, in any province, reach 10 tiles on all sides = 23 X 23, fountains, which require 4 workers each, are climate effected.
As you may have noticed from the first, long housing graph, in non desert maps a fountain covers the same distance as a Colosseum when one of its corners is placed over the fountain. That means, a single fountain can supply water to both sides of a long housing block, and each fountain can be placed with 8 spaces in between one another. As stated, a fountain in a desert province only covers three tiles beyond that of the fountain itself (6 spaces between each), thereby increasing the amount you’ll need. In desert provinces, for the long common housing blocks, you will find yourself having to place fountains behind some of the houses and in place of medium statues. In doing so, try to make it so that they otherwise fit in between two medium statues:

Note. For that particular map’s population rating, I only needed 16 Large insulae per housing block.
It is worth keeping in mind the following: once your common housing evolves to large insulae in a desert map, and with the long housing, where you’ve placed a fountain behind one of the singular (1 x 1) service buildings, the fountain will serve both sides of the road.
Walkers. These are the people who provide much-needed services and help your housing evolve. There are two types of walkers. Local and roaming. Local ones walk within a designated area. In maps where military buildings are present, gatehouses are used as roadblocks, a means of confining local walkers within them. Roaming walkers, on the other hand, industry, including farms, and entertainment providers, walk to their destination building and, where necessary, through gatehouses.
Military. You can only have a maximum of six forts. Cavalry and Javelin require no armour and can only adopt two formations: / & \. Likewise, Legionnaires, which need armour, can adopt the same two formations along with their legendary turtle formation (4 x 4). In order to set them in a turtle formation, at least one of them has to be trained at a military academy.
The first time you move soldiers from the first fort, one that is a mix of standard and Academy trained troops, you need to click one of the soldiers and select the turtle formation. Thereafter, and since all the soldiers in additional forts are Academy trained, they will automatically assemble in the turtle formation.
To add further strength to several such groups of legionnaires, overlap the ends.
Moving soldiers into position. This is important. You cannot move and position the fort’s flag with the game paused. Therefore, the best way to do it is to slow the game down to 10% ahead of an invasion and select the fort’s flag, left click, then move the on-screen curser to where you want them to deploy and right click the area. If you need more than one lot of troops, pause the game and move the map’s view to another fort. Don’t be too fussy where you place the flags until you’ve placed the last one, as the soldiers will take some time to reach their destination unless you happen to place the forts close to the invasion point. Increase the game speed (no more than 50%) and then space out, position, the flags in an orderly manner.
Barracks. In addition to training soldiers, this building also sends guards to defensive towers. You need to be aware that tower guards are trained first. Not only that, but if you rotate the map, you may find that the odd tower defence, a ballista, has gone missing. Not something you want to happen with an invasion imminent, so be careful.
On one map, where you need both levels of housing, you need two barracks, while the limit is just one. To have a second barracks, place the first one back from a road and immediately place the second. Finally, place a road tile connecting the first barracks to the adjoining road. In checking that point, I managed to place three, two of which were adjacent to a road.
Be advised, if you are training legionnaires when you have two barracks, armour won’t be delivered to what should be the main barracks. To get around that hurdle, you need to delete the other barracks, move the map to the main one and watch for a deliveryman taking armour to the barracks. Once you see that, and with the control panel visible, click the undo button and the deleted barracks will be replaced. You will, however, have to repeat all of that for each legionnaire you need.
Walls and towers. Most of the early peace missions, where invasions are likely, indeed some of the early military ones, only require well-placed defences in the form of walls and towers. Walls need to be at least two deep, a necessity for towers, which you place over a 2 x 2 section of wall. They also need a road leading to them and that road has to be connected to a barracks.
Invasions and warnings. The size of invasions, the army you face, is determined by the difficulty level. You will receive two main warnings, each one different, of an impending invasion. Note that some invasions can follow one another, so heed the different type of warnings:
Distant battle. Enemies closing (2 years before invasion). Enemies at the door (1 year before invasion). Thereafter, you only receive the 2nd and 3rd warnings.
Local uprisings: These tend to occur instantaneously, especially if, on one map, Mars gets seriously angry at there not being a temple built in his honour. They look the same as natives. (See below.)
Gatehouses. These require their own section in this article and this is why. Unless you place a gatehouse directly over a section of road, when you move its green ghosted image into a clear position it alternates its orientation.
Natives. Occasionally, you will find yourself having to build a city, even take over a poorly run one, with local natives present. You need to do three things to pacify them. First and foremost, until you’ve gained their trust, do not build on the red tiles displayed with the Risks, ‘native’ overlay selected. To quell them, the only building you can place on the red tiles is a mission post. The third thing you need to do is export goods to another Roman province.
All three points are covered in greater detail in the 6th career game levels, and you will find helpful advice on these 2 missions below.
Gods and their blessings. In all, you have 5 Gods: Mars, Venus, Mercury, Neptune and Ceres. Build temples evenly (the same amount for each) and they may lavish you with gifts, even more so when you hold a yearly festival and dedicate it to one of the five Gods. Small temples are ever present while large ones, used to evolve palaces, require 2 x marble. Mars sends a spirit that will cut down the next invaders (depending on the size of the invasion). Neptune doubles payment by traders for the rest of the year. Venus lifts the spirits of your people. Ceres boosts your farm crops, making them instantly harvestable. Mercury fills a granary with food, ideally, an empty one and 600 of each food type. Mercury’s gift is best used for your patrician housing while the granary itself, once filled, should be isolated until it is needed prior to villa evolvement Also note, one map requires two blessings from the God. Isolation the same as the warehouse screenprint above.
Labour allocation. You need to prioritise your labour at the start of each mission. This is best done when you increase the wages you pay your workers. Other than a northern province where there is no risk of fire, the order is: Prefecture, Engineer, Health (doctor) & education, Governance/religion, Water, Food production, Industry & commerce, Entertainment, Military.
To offset the increase in wages, increase tax by 1%.
Industry. Apart from Marble and food crops, 10 of each raw material are produced every 12 months while five of each finished good, including marble, is produced during that time. In that sense, you need two workshops for every raw material building and farms (olives and vines).
Saving a game. There is a limit to the amount of game saves you can view and subsequently load. In that respect, do not save games by the province’s name. Instead, save it by the career level of which there are 11 including the 2 tutorials. CG3P for peace and CG3W for war. Those being the first pair of missions after the tutorials. Also, make the first save A1 (thereafter, A2, A3, etc). If, for some reason, you find yourself having to go back to an earlier save and continue from there, make your next save ‘B’ followed by the next number after the one you loaded. So, if you loaded save A5 the next save will be B6.
There are two ways to clean out the game saves and, take it from me, you will find yourself having to do so. 1) Locate the Sierra folder on your computer’s hard drive and copy the career level saves for a completed mission to a folder outside of the game’s. Once you’ve done that, you then delete the saves from the actual game folder. 2) Open the game folder and delete a large proportion of the game saves, leaving several of the first and last saves, that way you’ll have a reference point for re-playing the game at a later date.
Mediolanum. CG5W. This is very much an all out war map, one fought in a northern province, the Alps, no less, where you face wave after wave of invasions from Hannibal’s armies and war elephants. The mission will test your military prowess. In that respect, do not complete it.
Carthago. CG6W. There is a fishing warf situated along the desert sea bank. Unfortunately, try as you may, you can neither delete or make use of it. Hold on just a minute. I Just now, in checking the name of the building, deleted it. That has never happened before.
Career level 6. Both maps offer a choice of climate, along with contrasting problems, while both provide your first taste of natives.
Lugdunum (now London). This total peaceful offering looks easy, deceptively so, in fact. Although the expansive area of the map looks tempting, especially with the distance from the entry point being that much closer, that is where your villa housing goes. The rest is for you to work out.
Cathago (see directly above). Ah, yes, Carthago. One of 2 cities where people are leaving. What you learn here will set you up perfectly for Caesarea. Get that one wrong and you’ll find yourself reduced to a Galley slave.
Preparations: If you haven’t already done so, load the last save of Miletus and reduce difficulty to very easy. The outset will otherwise drain your initial funds. Reduce game speed to 10% and turn Gods affects off until you have your first long housing block in place. Before that, you have the rampaging, destructive natives to quell, not helped by the fact that people are leaving the city.
You need to trade oil and marble with them. Oil, you’ve got, only the receiving warehouse is badly situated over a needed road. Be advised, you will have to change, gut, most of the NW housing and some of the roads. Act rationally, making sure the educators from 3 mission posts have adequate access to the native huts at the NW end, while you only need 2 at the SE end.
To get started, note the small area by the entry point where 56 new housing plots fit perfectly.
Other points.
Senate. Although it is useful in the tutorials and spawns a tax collector, since a forum costs less and requires fewer workers, it’s more of a hindrance when you need workers.
Governor’s residence. You can have one of several types in your city.
Hot keys. The game has several useful hotkeys: W = water. F = fire. D = damage. T = problems. To change the view back to normal, either press the same key, another hot key or the space bar, which can be used to toggle the last hot key on or off.
Bookmarking a location. Using the F1 to F4 function keys you can bookmark 4 location views on the map. Simply find a point you want to jump to, then hold down one of the Ctrl keys on your keyboard and press one of the four function keys. To jump to one of the four locations, simply press the function key associated with it. Be advised, it only works properly if the map view is the same orientation. If you set the bookmarks with the top of the map pointing North and press the function key while the top of the map is pointing somewhere other than North you’ll find yourself somewhere else. Also, if you use a bookmark to move a flag associated with a company of soldiers, it won’t work.
The electronic manual is full of information about the game, in particular, Appendix building summary from page 201. Although It contains useful information on every building in the game, there are some notable errors: A fort needs soldiers not workers. A fountain needs 4 workers. A gatehouse needs no workers. And a hippodrome needs 150 workers.
Map editor. To play the Valentia map, which is a non-military one, you need to add a gatehouse from the buildings allowed section. See screenprint of the map editor’s settings menu:

Furthermore, you also need to add the missing Lion pit to and remove the chariot maker from the Mediolanum map. Feel free to change desert provinces to Northern or Central.
Note, if you do decide to make any changes to the construction kit maps, save the map as its name followed by a number.
Winning the game – with Patrician housing present. In addition to what I’ve mentioned, specifically making the housing goal the clincher, in some of the missions where you need patrician housing, which takes time to fill up, once, and only once you have achieved or exceeded the prosperity rating, the later being your better option, and before September, place a small amount of housing plots in close proximity to the entry point of the map. They won’t affect your prosperity rating until the end of the year, while you should finish the game before that.
Continuing to govern a city. All of the games allow you the option of governing your city for additional years after you complete a mission. In Caesar III it’s 2 or 5 years. Feel free to do so, but with these words of caution: Not a city that has Villas or Palaces present, as you could run out of the non food items your people need. That said, and since you’ve completed the mission, you could, space provided, place enough housing for large tents to provide industry workers.
Watch out for its sequel, Caesar IV, a whole new gaming experience altogether!
September 2024 UPDATE:
Having watched some YouTube videos of this timeless game, I not only decided to apply some of the points but came up with a couple of new ideas that your game play will benefit from.
As you know from the prosperity chart above, tents are a hindrance to that rating. Additionally, and this is where a huge benefit comes in, the second house back from a road receives the same as that of the one against the road. With a garden and a road behind it (see next), any active building recruiter that walks along that road will find labour from the houses.

I call this ‘Swallowing up unemployment’. While you only need a housing level of Small cassa to achieve the prosperity rating, you will, however, have a huge unemployed labour force, as you are only importing iron for weapons. Added to that, you will need cultural buildings like the Academy to achieve the culture rating. As you can see from the screenprint, the 5 maintenance buildings are flying their red & blue active flags.
Next are two closely related things; one a problem overcome, the second a discovery.
In all, I have completed all but the final peace mission of this enthralling game. The problem I had was that of my markets running out of pottery and or furniture, and that despite their being an abundance of warehouses with plenty of the wares.
The same thing happened when I played Lugdunum and reached for Large Insulae. I then approached it more or less the same but only raised the housing to medium insulae backed up by 8 large villas instead of 6.
Study the following two combined screenprints. Note that the medium insulae, 1 of 4, has yet to merge as a large insulae. Note also the amount of each ware (food, pottery etc).

As you will note, the four none food items are about the same for each. Conversely, however, when the other 3 medium insulae merge into a large insulae, it will have the total of all four wares + food. On the basis of the single that = 32 pottery, 16 furniture and oil plus an abundance of food; two types.
Taking that into consideration, it is possible to con the prosperity calculator into setting a higher prosperity cap. This is how that works.
Aiming at a housing level of large insulae and a population of 5,000 of which you will need around 20 large tents, they will only make a difference of – 1 large insulae of which you will need 54. If, and it’s impossible with the original unmoded version of the game, all of your housing were to merge as quads (a solid 2 X 2) those large tents would eat into your prosperity rating and its cap. 20 L tents = 200 + 54 S Cassa = 1890 total points of 2090 / by 74 = 28 prosperity. If, on the other hand, they were 162 S Cassa = 5670 + 200 = 5870 / by 182 the prosperity becomes 32. An increase of 4 points. Not only that, but in non desert maps they can be laid out in groups of 8.
Fountain behind a single support building then LLLL and a further Fountain behind a single support building, For the school and baths (see above) they would go in between two service buildings: LLLL/Prefect/school/doctor/LLLL.
In desert provinces, however, it is 1 less: Prefect/LLL/Doctor.
Exciting November 2024 UPDATE:
At last! Finally, someone has put together, produced the most helpful YouTube videos for the first 10 missions; from Mission 1 ‘the New Governor’ to the two level 6 missions, for which there are two of Carthago. The reason being that, using the original Sierra produced game disc the game freezes, becomes unplayable around Sep 162BC. The completed mission, however, was played on an ASUS W10 PC with the Activision version downloaded from STEAM. There URL is: https://store.steampowered.com
Here are the Links to the 10+1 YouTube videos, which you will find most helpful indeed:
Mission 1 The New governor
https://www.youtube.com/watch?v=GB7A7y9HBx4
Mission 2 Brundisiam
https://www.youtube.com/watch?v=3oeUD3bmYRg
Mission 3P Capua
https://www.youtube.com/watch?v=WPPKfESjaow
Mission 3W Tarentum
https://www.youtube.com/watch?v=T1zCs_iSOFw
Mission 4P Tarraco
https://www.youtube.com/watch?v=svfXmap5k7c
Mission 4W Syracusae
Mission 5P Miletus
https://www.youtube.com/watch?v=FH3rjd-RgqU
Mission 5W Mediolanum
https://www.youtube.com/watch?v=IjkNNb_zNnI
Mission 6P Lugdunum
https://www.youtube.com/watch?v=Q1E1ZuYHh9U
Mission 6W Carthago (game freezes around Sep 162 BC)
https://www.youtube.com/watch?v=UbjUHwLkv-o
Mission 6W Carthago Complete
To return to the 'Main ' contents page click 'Contents' below.
To return to the Games 'Menu' page click 'Games'.

Contact us: the.irrefutable.truth2020@gmail.com